Nothing impressive yet
I decided, with all the embroidery silk I’ve been making, I ought to try my hand at embroidery.
So this is definitely still a learning experience; I am figuring out a lot of things!
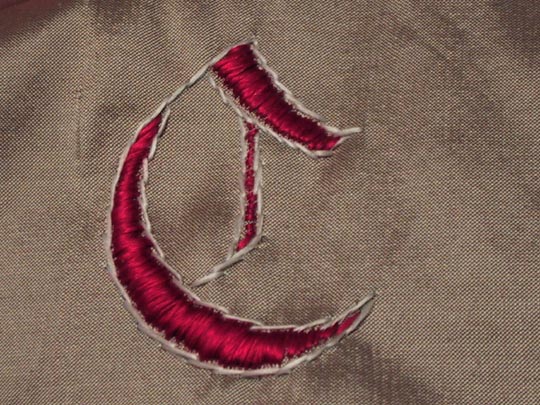
For scale, it’s just over an inch and a half tall. Red and white flat silk on smooth dupionni silk.
My favorite thing so far, is the sheen of the silk as it goes around the curvature. Un-favorite thing so far is accidentally pulling up tiny bits of the “tails” and having to chase them down and trim closer.
That’s absolutely beautiful – and this is your first time embroidering? I love the color.
Thanks! It’s not a total first time; I did a couple of small projects of embroidery several years ago, this is my first time working with silk.
Another fine example of your many talents! Well done, it’s beautiful.
Wow, beautiful. Did you dye the silk yourself? You do such beautiful work.
Yup, dyed it myself… I’ve been working on embroidery threads for a project.
Looks good, well done! Silk makes for such wonderful embroidery. Haven’t worked with silk, myself, but have seen the challenges it presented to other folks I known.
My only comment, is that the outline embroidery could be a *little* more consistent as far as stitch length, but this is at such a small scale that it’s probably only apparent at this magnification. It’s such a minor nit-pick, though, that I wouldn’t dwell more than a brief moment on that, because it’s overall really well done.
Now, let’s see a photo of the backside of the piece. [*grin*] In interests of full and fair disclosure, the reverse side of my embroidery pieces have always been a little messy. The best embroiderer I’ve known always had such immaculate reverse sides of his work. He took the position that the condition of the reverse will tell you a lot about how the embroidery will hold up over time.
Yeah – the outline bothers me too. It does show up more at this magnification than in person, but it’s still not quite right. The satin stitch also doesn’t quite abut the outline in places; it took a while to figure out how to place the needle. The next one, I’m going to experiment with running the outline in split stitch, and then satin OVER instead of inside it.
Starting and stopping this thread was challenging. This stuff is really more of a loose agglomeration of 160 tiny filaments held together by the fact that they take a similar path, and not so much a “thread”. It’s easy to split it down. That makes it tough to tie off, because *parts* of the ends can decide to go different ways. Let’s just say that the part of the back that I worked on after half an hour or so, looks better than the part I started with.
Use a small bit of beeswax on the threads when you go to tie them off. It’ll help them stay together when you try to convince them that they need to be tied together.
Pretty! Shiny! I started my first pokings at embroidery a few months ago. I took a hands on embroidery class at a local SCA event (taught by a girl who wpn an award for her recreation of the Bayeux tapestry) and she taught us some really helpful tricks. Like I was trying to put all my stitches side by side rather than spacing them apart and then filling them in. I’ve finished 2 smaller projects now including 1 from an embroidery calendar I got on clearance after new years that includes the cloths with the pattern where you by the thread. It’s suprisingly fun! And the results are so beautiful.
Ack and something about my monitor and the background I can read what I’m typing. Sorry about the typos.