 |
|
|
Bombyx mori - the silkworms' blog!
This is a photo-intensive, blow-by-blow description of my silkworm rearing. If you want to read more information about the process, check out Serving the Tiny Masters.
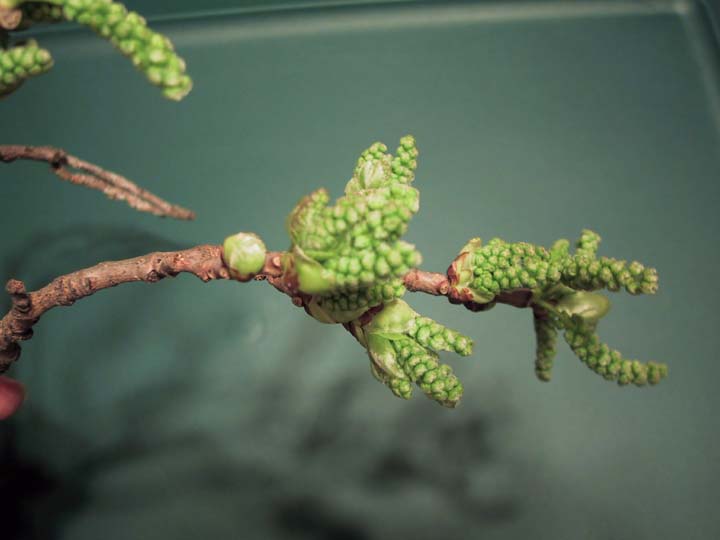
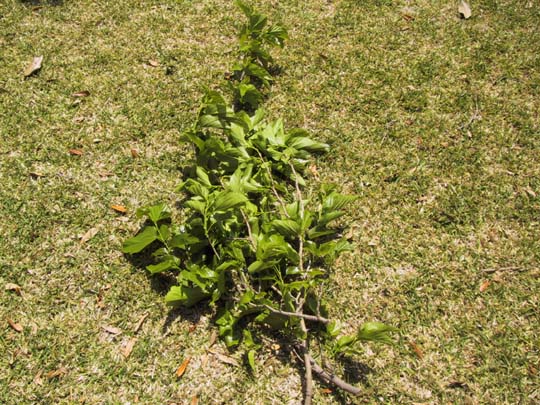
When the mulberry tree looks like this, it's time to take the worm eggs out of the fridge! These catkins are quickly followed by the tender new leaves, the kind that the hatchling silkworms love to eat.
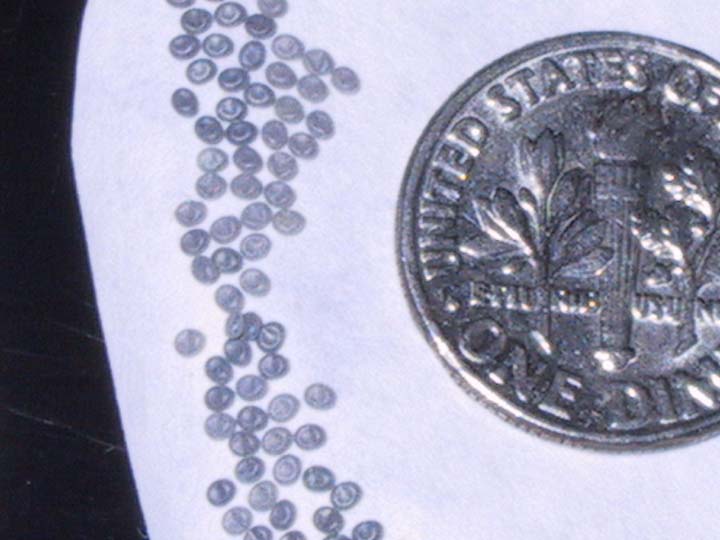
The Bombyx mori eggs were taken out of cold storage on March 17. I keep them in a special warm room that I use for drying my soaps; any place that will stay at or above 72' or so will work, but they'll grow faster and be healthier between 78' and 85' F. Healthy eggs are plump and not dessicated. If you look carefully, you can see the caterpillar curled inside some of the eggs. The baby cats are curled head-to-tail like a letter C. Bombyx mori undergo diapause in the egg - similar to hibernation - they pass through the winter in a barely-alive state, and perk up when it gets warm again. Because they're so thoroughly domesticated, these two states are "in the refrigerator" and "out of the refrigerator."
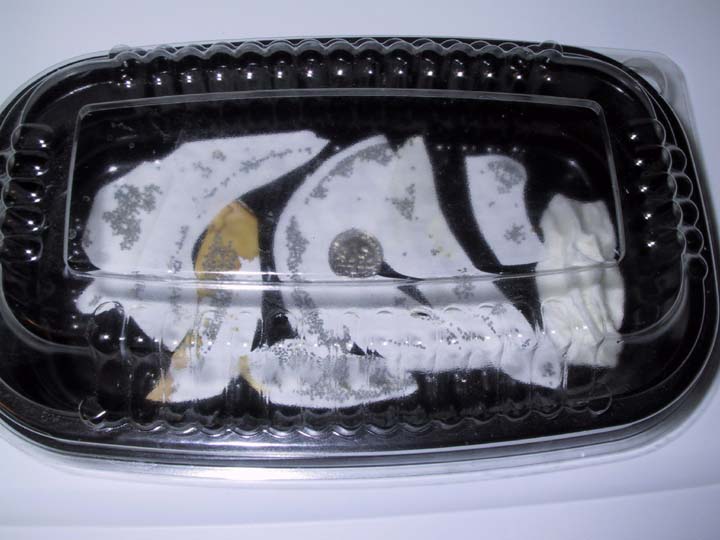
Here, you can see the sophisticated and classy egg-hatching setup. Yes, it's a salad container from a fast food place. There are probably eight or nine hundred eggs here; I just made a guess, selecting some from each of several different batches to ensure genetic diversity. As they grow and need more space, they'll be transferred to big deli trays with lids. I keep a moistened piece of tissue in here, to keep the eggs from dehydrating. Whether you need this or not will depend on your climate. It's essential that the eggs don't get damp, or mold - if there is condensation on the inside of the lid, it's too moist or the heat source is too direct. March 17, 2004.
It typically takes 10 - 14 days for the eggs to start hatching. It depends on several factors, including temperature, humidity, and the level of development before the eggs went into the fridge. Apparently some of these were ahead of schedule, because they started hatching out in just 7 days. March 24, 2004.
This is what the kegos look like REALLY close up. I got a new camera, and I'm working on re-shooting some of this information - so this is just a taste of the new zoom lens! This caterpillar is about 2 mm. long.
These little guys have to start eating almost immediately, or they dry out and die. You can see the tiny holes they've chewed in the leaves. The hatchling silkworms are called "kego" in Japan, or "chawki silkworm" in India. "Kego" is translated on one Japanese website as "hairy baby" - they are covered with little black hairs.
Here, you can see the size of the hatchlings.
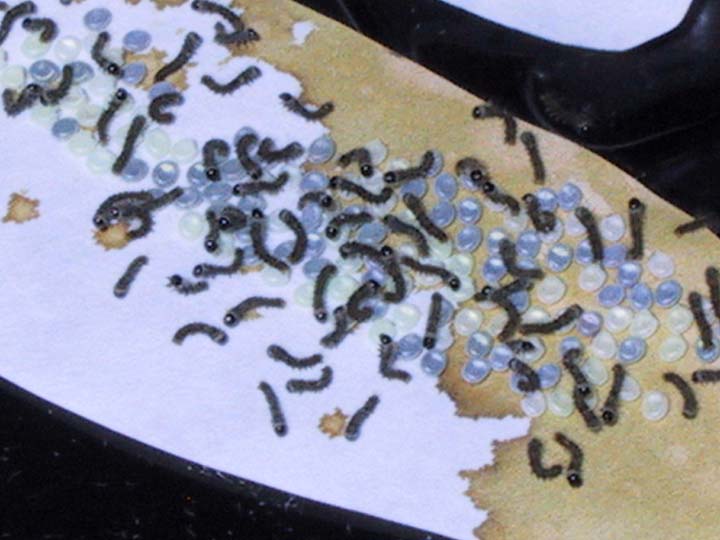
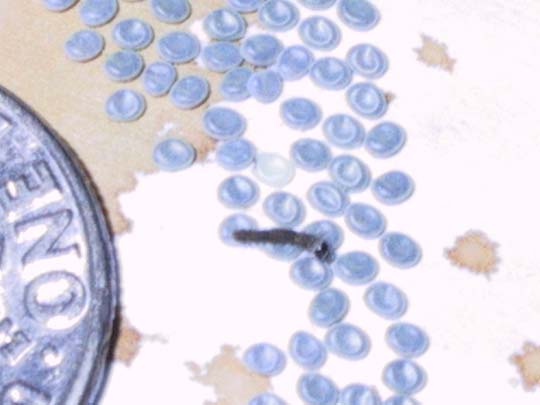
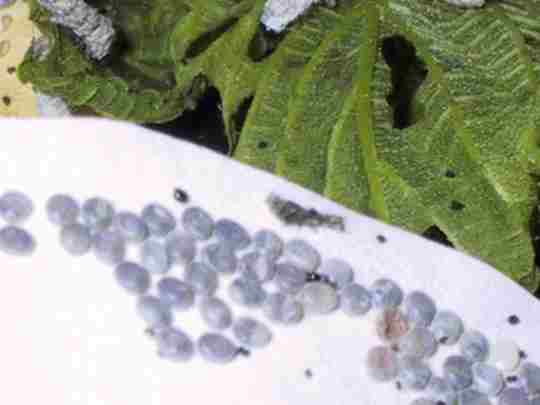
The first few usually hatch a day before, and then the mass hatching starts on the second or third day. This makes Bombyx mori easy to rear, because they will go through all their various stages and change simultaneously. Note that the unhatched eggs have a "blue" cast to them - this is because they will hatch soon. Overall hatch rate on this batch was well over 90%. The brown staining on the paper was from the moth. The mass hatching makes them look like a hill of ants; a Chinese name for this stage is "ant silkworm." March 25, 2004.

This is the best way to move the kegos around. This is a synthetic sable #1 brush; anything from a #0 to a #2 will work fine. I find that they need to be "wiped" off the end to put them down on a new leaf. Each worm makes a silk "safety line" and attaches itself to the leaf it's on; that makes them easy to sweep up and move.
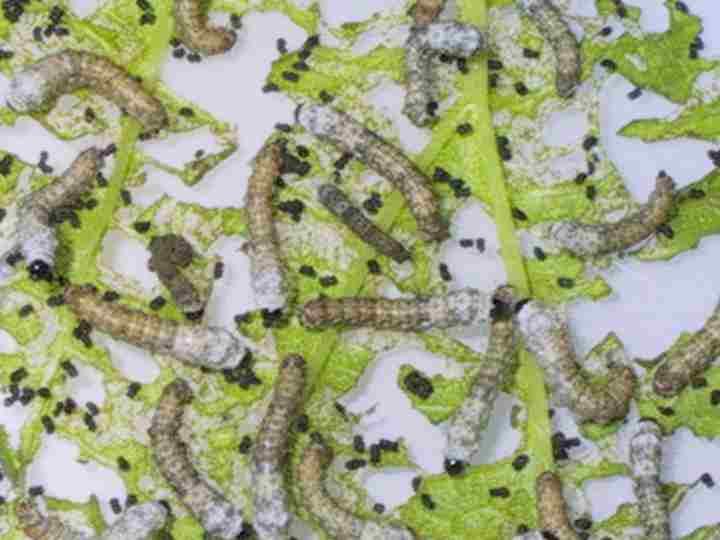
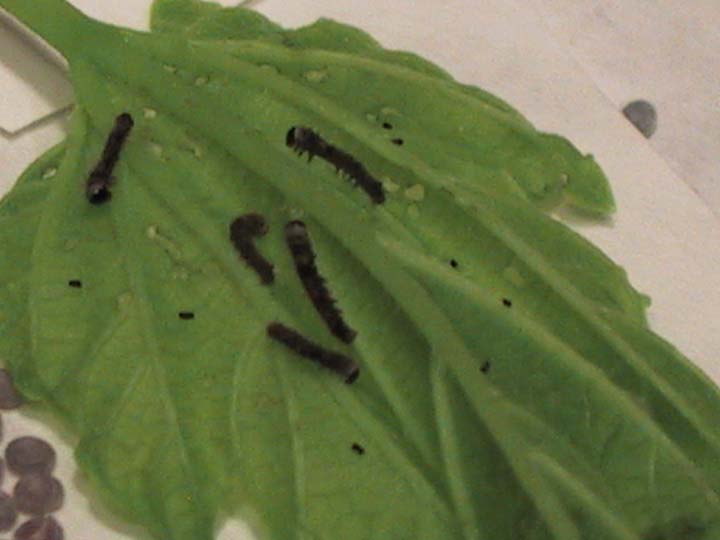
This is the third day. The worms have more than doubled in size already. Just above the center of the photo, you can see a tiny new-hatched worm; compare its size to the ones around it, and you can see how much they've grown! Also, you'll notice that instead of just nibbling holes in the leaves, they turn the leaves into lace. The leaves are held together by the veins alone.
NOTE: Raising silkworms is a learning process for me. I keep learning new things - so I'll share them with additions as I go along. I have found a much better way to clean the silkworm trays; check out NETTING UP. Added summer of 2005.
Overall, though, they're still quite small. March 26, 2004.
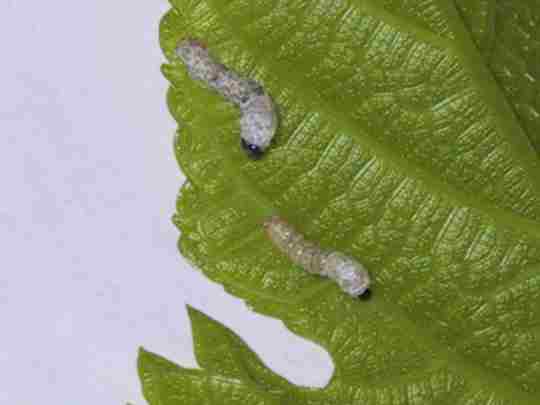
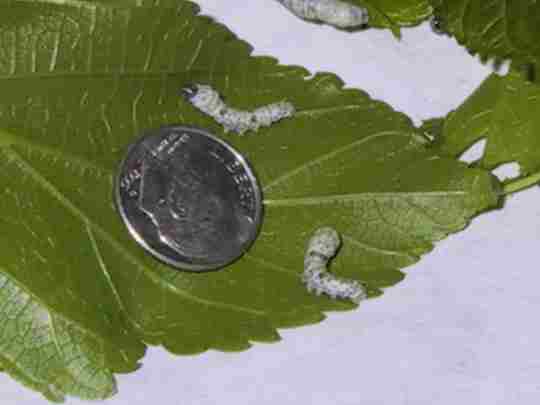
A couple of days later, the kegos are changing their skins! The second-instar worm at the top has already shifted his skin; note the larger face plate and the gray coloring. The worm below is about to change - you can tell because his white shiny skin looks too tight for his body. His tiny face will be replaced by a much larger one, which will allow for faster eating and more growth!

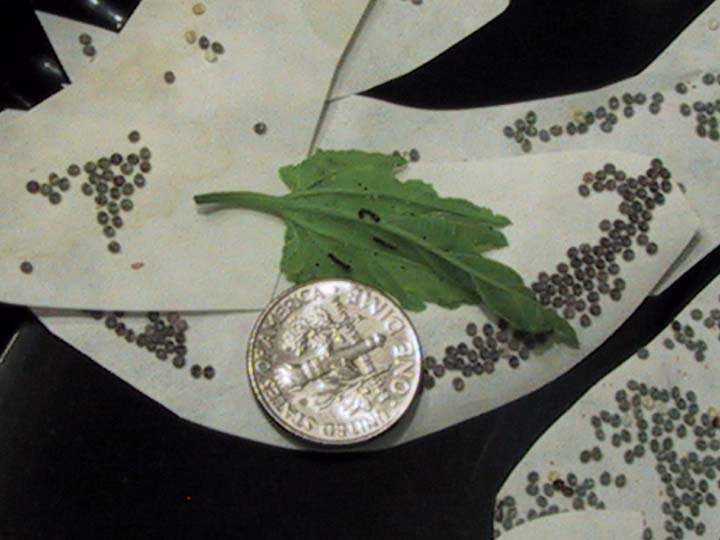
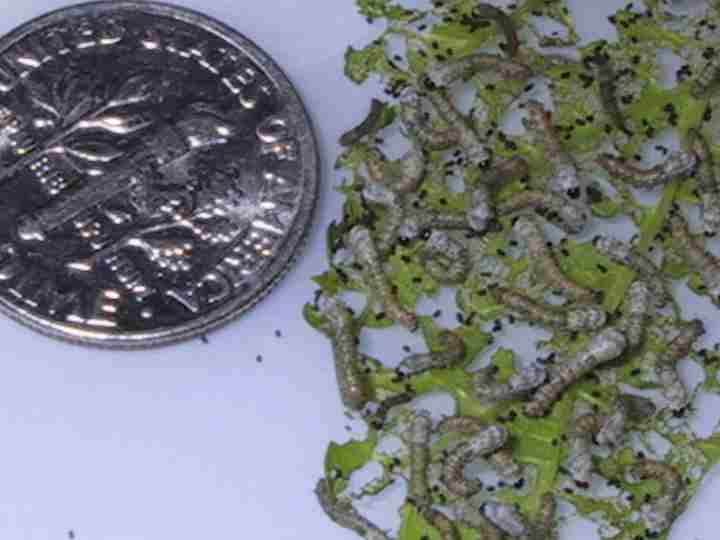
These are second-instar worms with the dime for scale.
This worm has crawled off the leaves to change his skin. I call this "praying" because he looks like he's in prayer or meditating - they sit with their heads lifted up, immobile, their legs folded before them, for hours or even a whole day.
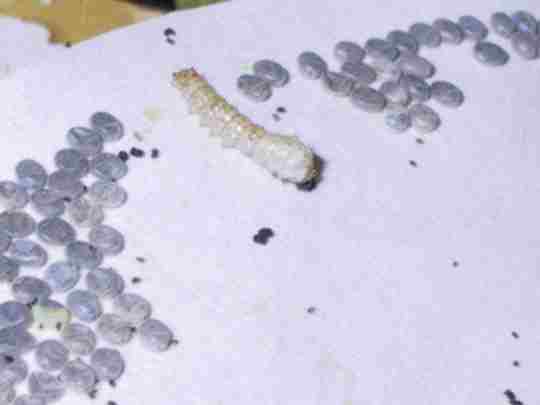
When the worm steps out of its skin, it leaves it behind like this. Imagine someone slipping out of their pants and just leaving them in a puddle on the floor. March 28, 2004

The worms are big enough now that I change them up to a larger tray. This is
the kind of tray that they will live in for the rest of their life cycle; as
they grow, I just split them out to additional trays. This is a deli tray -
if you're not fortunate enough to work for a company that buys them to throw
parties or treat the staff to cheese and fruit (have I mentioned that I love
my job??) see if you can talk your local grocery store deli counter out of two
or three. Otherwise, you can buy them at places like Sam's or a restaurant supply
house. The lid isn't really necessary, because the worms won't crawl far from
the leaves until it's time for them to spin - but it helps keep the leaves from
drying out.
NOTE: I have since learned that it's essential to put holes in the lids to ensure air exchange and prevent mold and disease. I cut out some of the little raised sections along the side, and put 4 to 8 holes in each lid.
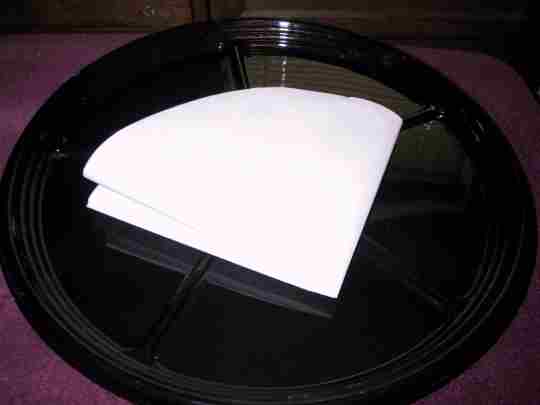
To make the cleanup easier, I line the trays with a piece of freezer paper folded
and cut into a circle.

When I transfer the worms, I do it by picking up the leaves they're eating and moving leaves, worms, and all to the new tray. This allows me to leave behind the older leaves beneath. I find that I can build up 3 to 5 layers of leaves before they start to get moldy and nasty beneath; it varies depending on temperature and humidity. Individual worms that are left behind on the litter can be picked up *very gently* with tweezers or forceps, or with a paintbrush. It's easy to crush them if you use your fingers.
NOTE: Check out NETTING UP for a faster and easier method to move the worms off their old bedding. With the netting, I don't use the freezer paper.

This is the amount of leaves they're eating right now. It's about 4 pieces of branch, each a foot or so long and only as thick as a pencil. The basic idea is to have enough leaves to entirely cover the worms; imagine covering a pizza entirely with pepperoni slices. If you put leaves a few inches away from a worm, it's a dead worm.

This is what they look like once they've been fed. After this, they're good for another 6 to 8 hours. The more you feed them, the faster they grow. I usually feed them first thing in the morning, at lunch, after work, and before bed. They don't need feeding during the night, although I'm sure they'd appreciate it. March 28, 2004.
The worms have now begun to change into the third instar. This one is waiting for the skin to split... he will walk out of his skin after shrugging off his old face for the new one. March 31, 2004.

Here, you can see a worm that has just shed its second skin. Note that the head
is large and gray; it will darken over the next few hours. You can see the shed
skin behind it - the worms attach their claspers to the surface, and just wiggle
forward out of the skin to shed it.

Here, you can see the shed skin more clearly.
In this shot, you can see the second-instar face hanging from the jaws of the third-instar face. The faces pop off like masks.
For scale. The worms are getting bigger by the day.

And today, I split them into two trays. The ideal is to have 1/3 of the surface space of the leaves occupied by worms; when they get large enough that they don't have room to turn around comfortably, it's time for a bigger tray. Fortunately, these deli trays stack on top of one another, so the extra space just means more height. Feeding time is a bit of a juggling act, and the trays end up spread out across the cabinet, but they store quite neatly between feedings. March 31.

Today, the worms have started changing into the fourth instar. This change, like the ones before, means a bigger skin, a bigger face, and more food. April 2. There are several things to see in this photo. The worm in the center is about to change; it is going through the period of rest before slipping its skin. On the lower left side of the photo you can see a slipped skin - they are larger now, and very noticeable. On the right you can see a new fourth-instar worm, with the much larger head. And center top, there is a worm that failed to make the change. If they are disturbed during the changing process, whether by human hands, or by other worms knocking them over, it can cause them to get stuck and die. This worm is still wiggly, but will most likely be dead within a day. If you have worms that get sick, turn dark, become limp, or ooze any fluid from either end, they *must* be removed immediately from the other worms. If you feel like the little guy would recover if you only gave him a chance, you can put him into a tiny "hospital" tray with his own leaf. Sometimes they do go ahead and recover. Most times, they die. There are bacterial and viral diseases of silkworms that can wipe out an entire crop very quickly. Hygeine is the most effective thing that to prevent disease from spreading. Make sure to wash your hands after touching any sickly worm, and after cleaning up the trays. April 2, 2004.

At this point, the worms are large enough to handle gently by hand, instead of lifting the whole leaves. I usually count the worms when they enter the fourth instar; when I change their trays, I put ten at a time onto leaves, and transfer them to new trays. The size of trays that I use, 200 fourth-instar worms fit comfortably onto one tray, so that's 20 leaves with 10 worms each. This year, I have about 750 worms.
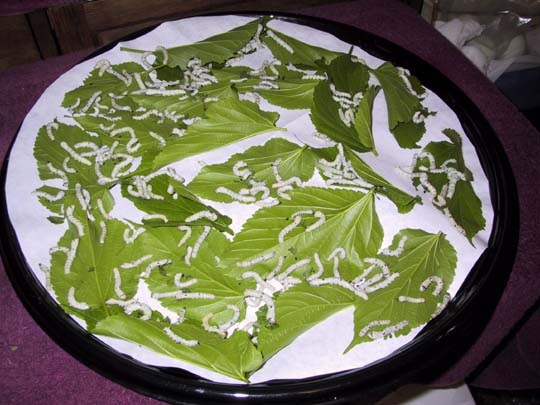
Here, you can see the 200 worms on the tray. This is good spacing - they are not crowded, and have plenty of room to move around. Each worm should have three times as much floor space as it needs sitting still. April 2, 2004.
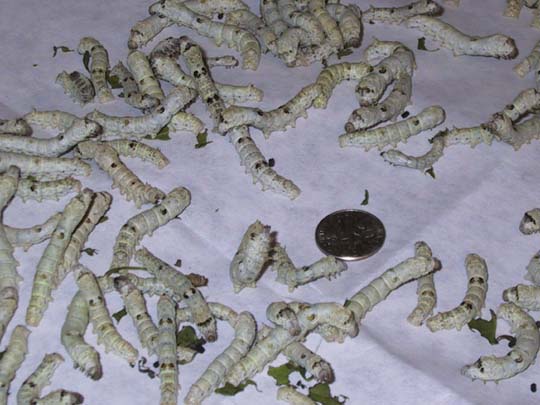
The fourth instar worms keep growing. Here are some of the worms off the leaves for cleaning-time. I skipped the stage of putting 10 on a leaf, because it's faster this way. The dime shows that they're continuing to get bigger by the day; the largest ones are about 1 3/4 inches long. You may notice that some of the worms, particularly one just to the left of the dime, and one in the upper left corner, are standing up on their hindlegs; unfortunately, because this is a still picture, you can't see that they're doing the Food Dance! They wave their entire upper bodies around in a wide circle, almost brushing the paper in front. They do this until food falls on them. If they don't touch any food after a few circles, they move forward a couple of steps and try again. This is because they are so thoroughly domesticated; the wilder types of caterpillar don't mind walking a little ways for food, and don't always expect it to be served up. April 5, 2004

And here's one of the four trays. The trays stack upward, so they don't take up much counter space, except at feeding time. Another thing that becomes really noticeable at this stage is the sound of the silkworms. They make a noise similar to rain on the roof, or a huge bowl of Rice Crispies. Some sources will say that it's the sound of them eating, but it's actually mostly the sound of their claspers as they move - they make the sound even without leaves. Five or six worms in a dish will be distinctly audible, but when you open up 4 trays to feed them, it's as loud in the room as if it were actually raining outside. It's a very peaceful, soothing white noise. It's even louder as they get bigger. April 5, 2004.
Today, the worms started changing to the fifth instar. You can see this one in the center stepping out of his skin. The change starts with a shrugging motion repeated several times, and then the worm starts to wiggle forward out of the old skin. The new head is much larger than the fourth instar's; I call this the Turbo High Speed Eating Head. Silkworms eat almost 90% of their total intake during the fifth instar, so that means that they will eat nine times as much in the next week as they have eaten, total, over the past three weeks. It becomes a busy chore keeping them fed.
Right now, they're eating this much mulberry three or four times a day. This is three branches with a diameter at the base of about an inch. This will triple or more over the next few days. As soon as the worms are done with the change, they will be transferred from 4 trays to 8.
April 9. These two worms are doing totally different things. The one in back is in the "Prayer Position" waiting for its skin to split; the worm in the front is waving its head around looking for food. It is important not to disturb worms when they are in the Prayer Position, because it can interfere with their changing of skins. When the worm is getting ready to change, it spins a little pad of silk and attaches its claspers onto it; then when it is ready, it wriggles and walks forward, leaving the skin attached to the silk pad. If you pick up a worm in this stage, you will hear a ripping sound as the silk is pulled free - sometimes the silk comes up with the worm, sometimes the worm loses its grip on the silk. Either way, it can make it difficult for the worm to shed its skin. If the majority of the worms are in the Prayer Position waiting to change, you can skip a feeding or two to help them out - if there is a mix of hungry worms and resting worms, just feed lightly so that the resting ones don't get covered with leaves.
This is what happens when a worm gets stuck in its skin. This happens even with the most carful handling; other worms walk across the worms that are trying to change, and knock them off their pads. Most often, I find that I have accidentally moved a worm that wasn't ready to move. Since the worm breathes through its spiracles (the black dots along its sides), it needs to shed its skin fairly quickly to avoid suffocation. This worm is in my "hospital tray" - notice that the worms behind it are a kind of rusty brown color. They will typically continue to darken, and eventually die, but sometimes they recover and can rejoin the others. Sometimes you can gently "peel" a worm that has gotten stuck in its skin; you have to be very careful to avoid ripping its delicate new skin. The old skin peels all the way off like a sock.

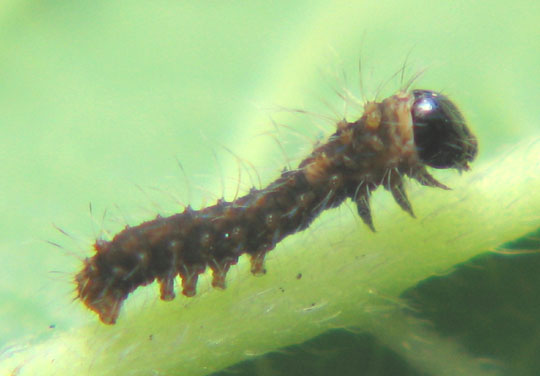
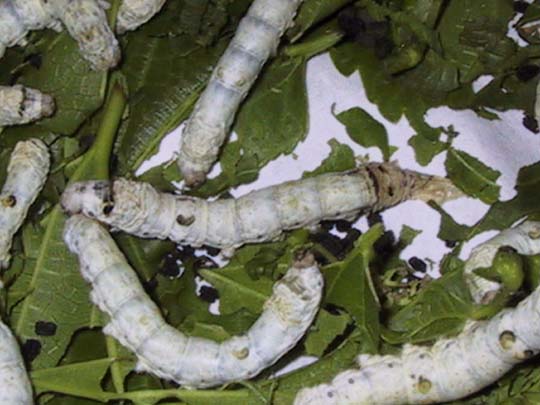
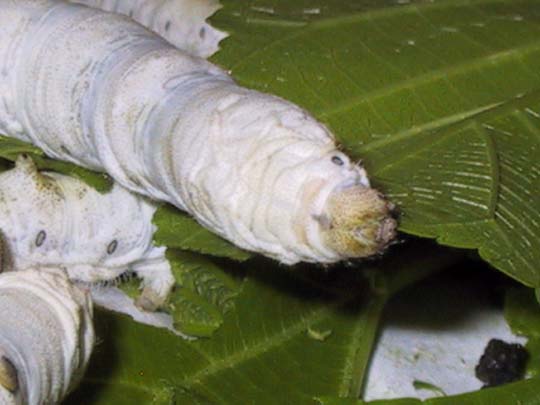
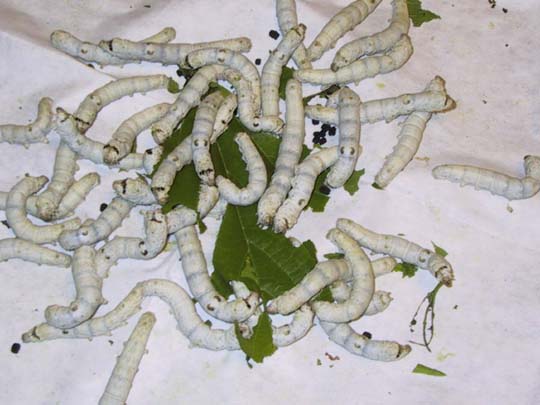
This is a full-grown fifth-instar larva. In this stretched-out position, it is two and a half inches long. It will eat voraciously, making lots of protein to spin its cocoon from and storing up fat for its pupation and its life as a moth.
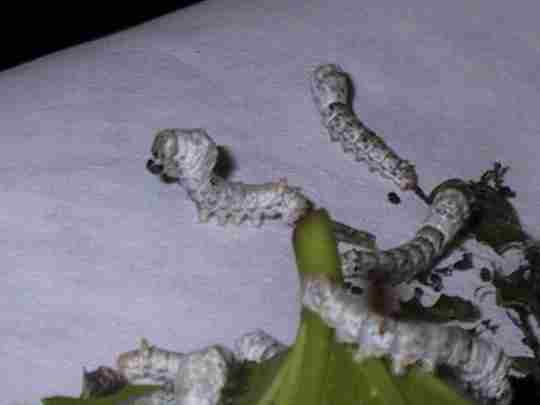
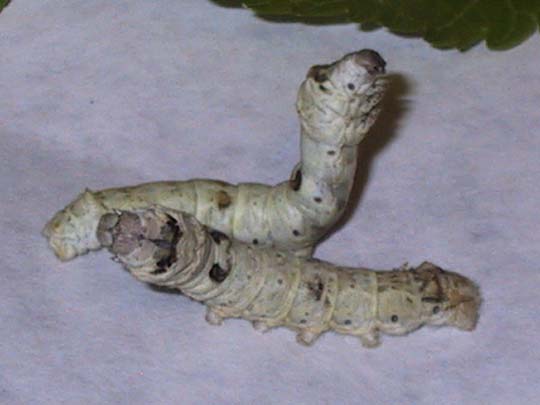
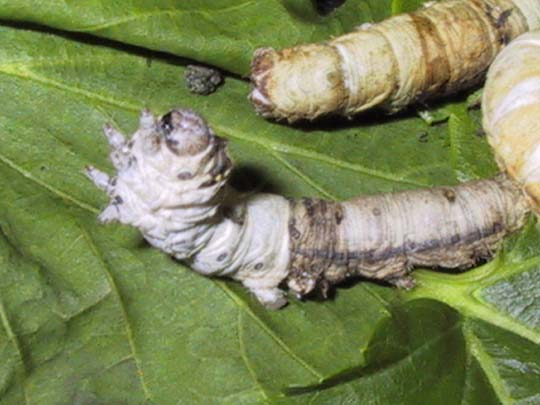
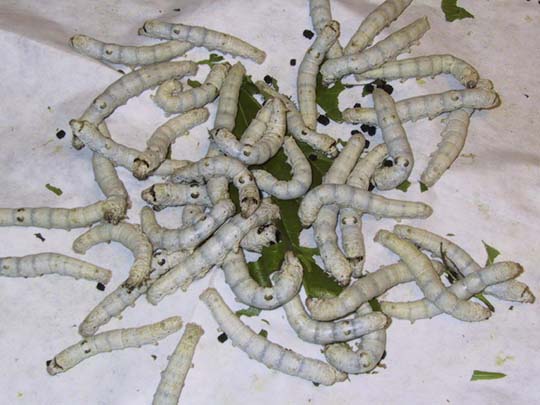
This year, for some unknown reason, I ended up with some white-faced worms. They don't have the usual black brow markings that the regular kind have. I know that there are different races of silkworms, and this may be a throwback to some previous breeding in the line.
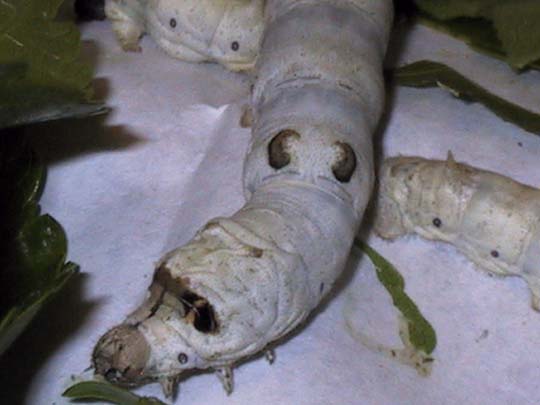
This worm has the usual pattern of markings. The bulge behind its head will get bigger and bigger over the next week or so as it fills with silk protein.
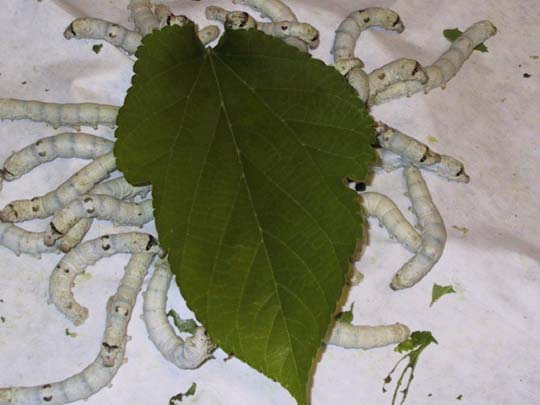 |
This isn't how I usually feed the worms, but I love this demonstration of their eating speed. These photos were taken at five minute intervals. |
 |
The worms attack the leaf from all
sides...
|
|
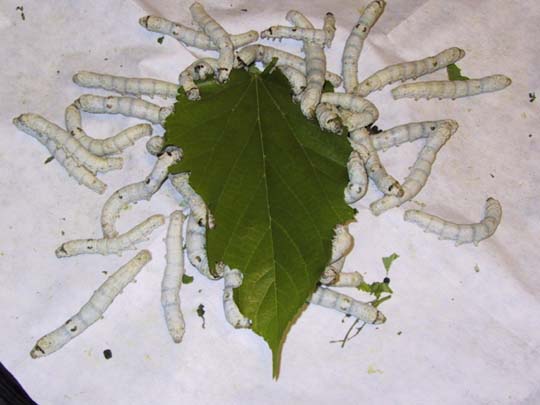
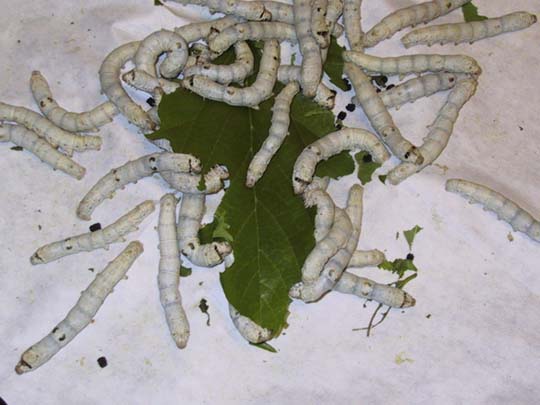
Within minutes, they will have reduced
the huge leaf to mere veins.
|
 |
Kind of like...
|
 |
Vegetarian piranha.
|
 |
|
 |
Total time elapsed: 30 minutes April 9, 2004 |
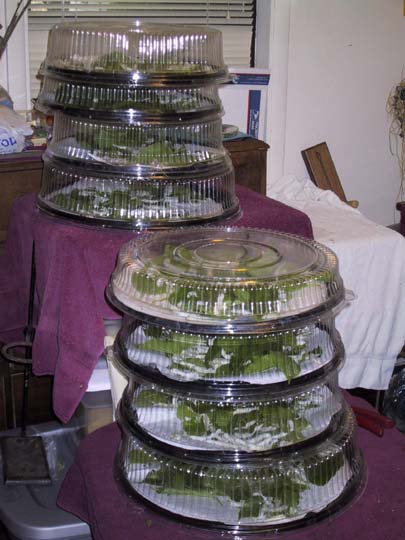
This is the current setup of trays. I like them because they stack up - it's still a significant amount of space required at feeding time, but at least they put away into a neat pile. April 11, 2004.

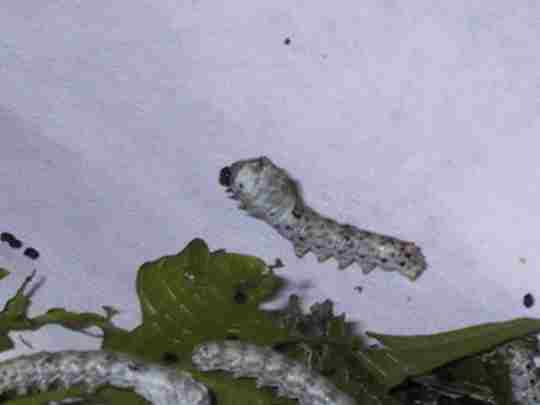
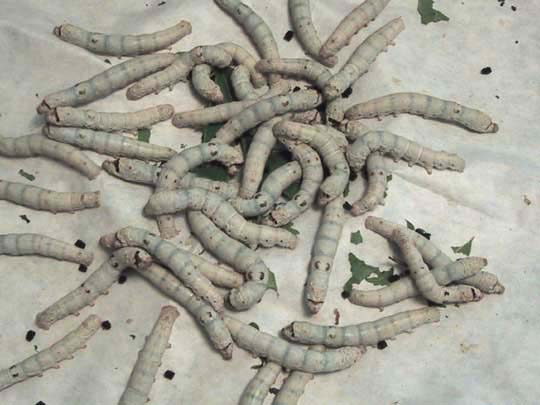
The worms have begun to spin. The worms stop eating and go into a rest, like when they are going to shed, but instead they dump out the undigested food in their gut, and start to wander and spin silk thread everywhere they go. The worm in the front has changed over and started to spin; the worm behind it hasn't yet. Note how much smaller the worm in front is - they lose a lot of size when they make the change. They also develop a translucent yellowish shade that the camera can't quite pick up - they look a little waxy, and the greenish hue (caused by the mulberry leaves inside!) that they usually have, disappears.

The gut dump is something I wasn't prepared for the first time; none of the sources I read mentioned it. Some times it's just a loose green version of their regular frass; other times it's a wet nasty splat. If caterpillars do this any other time except when they're getting ready to cocoon, they're sick and should be isolated from the brood. After dumping its gut, the silk worm will never eat again; it lives off of stored fat through its entire spinning, pupation, and adult life.
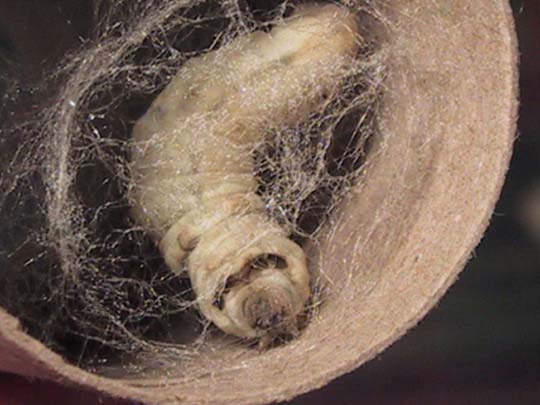
The worms will wander around, and find a space to spin. Ideally, they want a close environment; they will spin up in the leaves, if you let them. Their second choice is in the lid of the top of the tray. Either of these locations tends to lead to slightly irregular cocoons; it's best to put them into a dedicated space to spin. I use toilet paper tubes, although when I had a thousand worms cocooning at once in 2002, I made bushes from the discarded mulberry branches. This is the only time that the worms will entirely leave their trays if they're not covered - if you raise them in a box or aquarium, you could find worms up in the corners of the room or in your drapes. This worm has begun spinning the "flossing" of his cocoon - this forms the framework that will support the cocoon, sort of like a hammock. This silk is slightly thicker than the reelable filament, and is not continuous. It is used in making spun silk thread, and is called cocoon strippings, blaze, or keba. The worm will spin non-stop for up to three days before shifting its final skin and becoming a pupa. The worm waves back and forth to spin the flossing, but once it gets the framework set up, it will make a slow, deliberate figure-8 motion with its head, thousands and thousands of times.
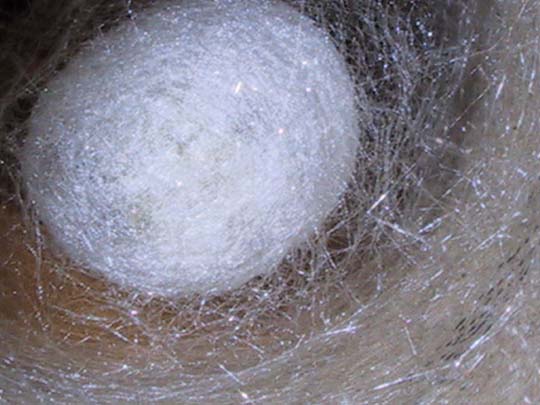
After a couple of hours, the cocoon is dense enough that you can no longer easily see the worm at work.
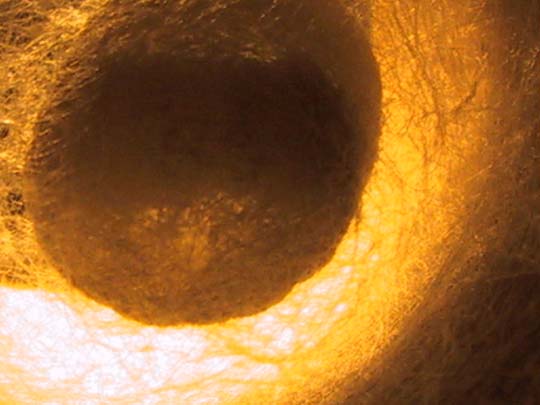
But if you hold the cocoon up to a strong light, you can see through the cocoon - at least for several hours, before it becomes totally opaque. April 11, 2004.

April 15. The worms have begun spinning in earnest. It's like an avalanche - the first few days, it's two or three each day - then, all of a sudden, dozens and dozens each time I check. When the worms crawl upward onto the tray lid, or start to spin up in a leaf, I transfer them to the tray full of tubes. The tubes are stacked end-upward like a honeycomb, providing a perfect little space for each worm. You can cover it with the bottom of the tray, if they are adventurous. Once the worms have a good start, each tray can accommodate a second worm, inserted at the bottom - don't put it above the worm in progress, or it may stain the cocoon with its droppings.
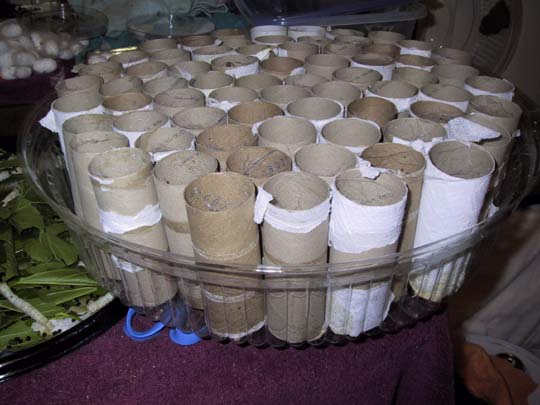
This is the full tray. There will eventually be about 4 of these; each one will hold about a hundred tubes, which can be doubled up to hold 200 worms. Once the cocoons are firm and opaque, you can pull them out to make space for more. The worms generally won't crawl out of a tray like this (the plastic edges are forbidding, and they never want to crawl down... ) but I wouldn't lean them against a wall or drapery. April 15, 2004.
NOTE: The following section describes the processing of the cocoons to kill the pupae inside. If this troubles you, please don't read it.
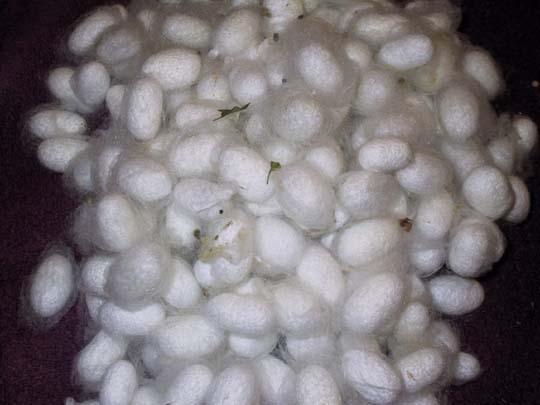
This is the crop of cocoons. The very largest and finest cocoons are saved for breeding, but the remainder are stifled (killed) to prevent the moth from hatching and destroying the silk. Cocoons should be stifled after the worms have changed to pupae (about 6 days after the start of spinning) but before the moths would begin to hatch (about 2 weeks after spinning). Hatched cocoons can be used for spun silk, but are no longer useful for reeling. Reeling produces the most regular, lustrous, and desirable silk. April 21, 2004.
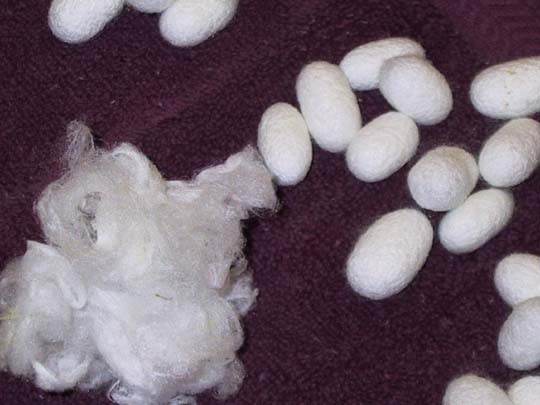
First, the blaze is separated from the cocoons. This is the first thread that the worm spins when beginning the cocoon. It is called cocoon strippings, blaze, floss, or keba. It is useful in making spun silk. Any cocoons that are soft, stained, or irregular are sorted out. Some will be discarded, others will be added to the silk used for spinning.
The way that I prefer to stifle the cocoons is to bake them in a 180'F oven for 30 - 40 minutes, and repeat the treatment a couple of times over two or three days to fully dry the cocoons. If your oven won't go below 200'F, be careful that the cocoons don't scorch. It is also possible to freeze the cocoons to stifle them, or to place them in hot sunshine. The reason that I prefer the oven, is that it dries out the pupae so that they will not rot and smell bad. They do tend to smell, but the smell of the under-baked ones is really rank. If you choose freezing, make sure to keep them frozen until it's time to reel them. For information on how to reel the silk, click here. April 21, 2004. The stifled cocoons should be stored in mesh or fabric bags, not in sealed plastic, to help prevent molding.
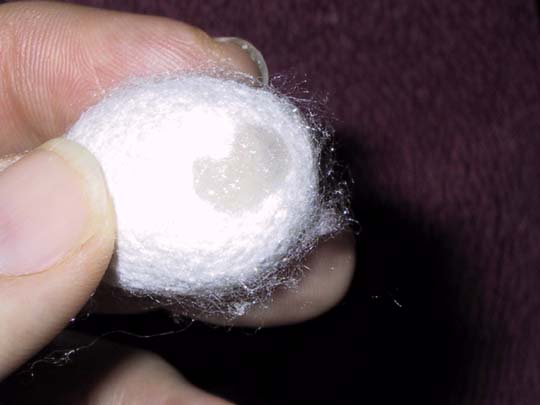
May 4, 2004. The first signs that a cocoon is about to hatch, is that it will become wet on one end, and often rock back and forth. The wet spot is from an enzyme called cocoonase which the moth squirts out of its head to partially dissolve the cocoon threads. Cocoons usually hatch at dawn, and usually about two weeks after the start of spinning.
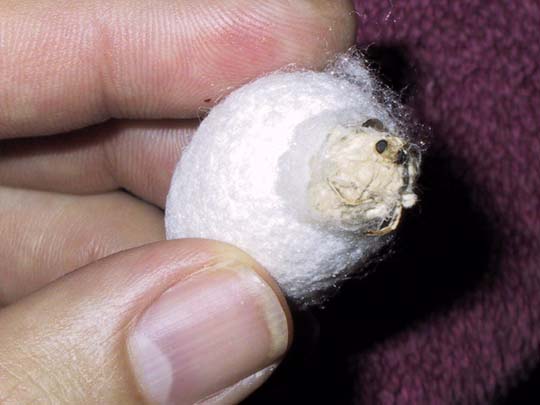
After much struggle, the moth will begin to push its way out through the damp spot on the cocoon. The moth will emerge damp and bedraggled looking.
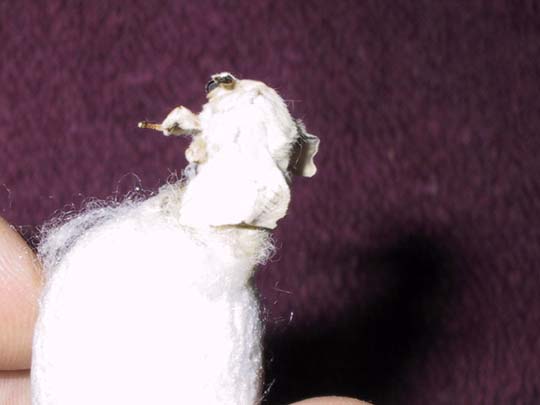
The moth wiggles its way slowly out. The process is complex; first, it pushes forward with its head, then, it swells up the sections of its body one at a time, slowly moving forward.
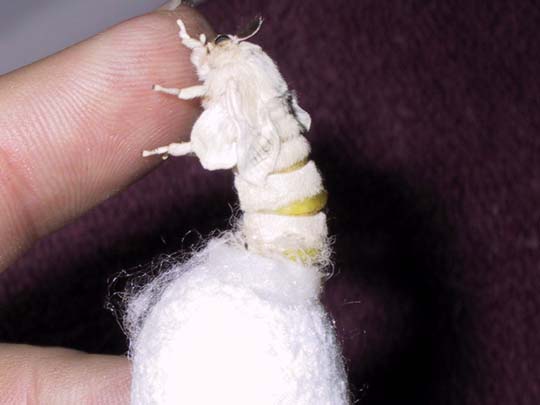
Eventually, the moth pulls free of the cocoon. They will often grab on to an adjacent cocoon, or climb up the side of their own; I provided my finger to give the moth something to grab onto. This moth is a female; you can see her abdomen is distended with yellow eggs, which you can actually see through her skin in between the furred stripes.
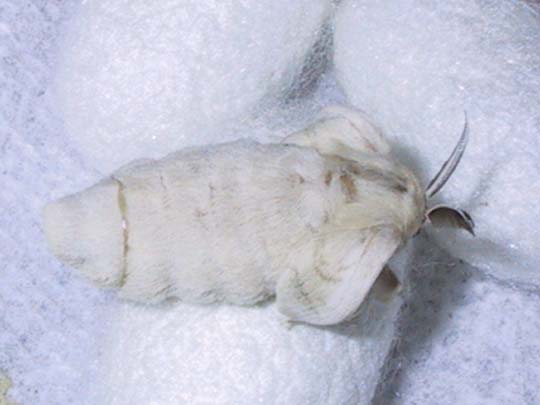
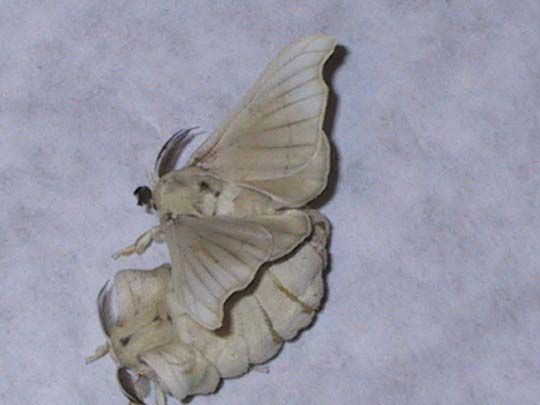
The female will rest on the cocoon, and spread out her wings. Yup, those wings there are spread already; sometimes they get a little bigger, but not much. Because the moths have been bred for domesticity for thousands of years, the moths never fly, and the wings are essentially vestigial. The males will buzz their wings sometimes and stomp around, but none of them can manage even a short flight. The females are so big with eggs, they can barely walk.
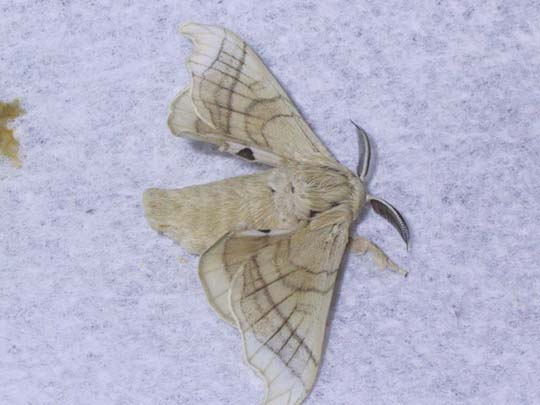
This moth is a male. You can tell by the much smaller body. Other than the female's huge egg-laden abdomen, the two sexes are very similar. Males often have more normal-appearing wings.

Not long after she emerges, the female will begin to scent. She sticks out a special gland from her abdomen which exudes a pheromone. Many of the Saturniid moths wait until dark, or even the following day, to scent; Bombyx moths scent usually within seconds of emergence. The males are unable to fly, but the pheremone drives them crazy, and they buzz their useless wings and walk excitedly around. It's actually kind of comical.

The male moths are driven wild by the pheremones. They will try to mate with anything even vaguely moth-sized, including cocoons and each another. The brown stains behind the moth are from the fluid that the moths squirt out from their bodies - they're especially likely to squirt when excited or startled. It's called meconium. The moths use the fluid to inflate their limp wings after they emerge; once the wings have hardened, they withdraw the fluid and secrete it as waste.
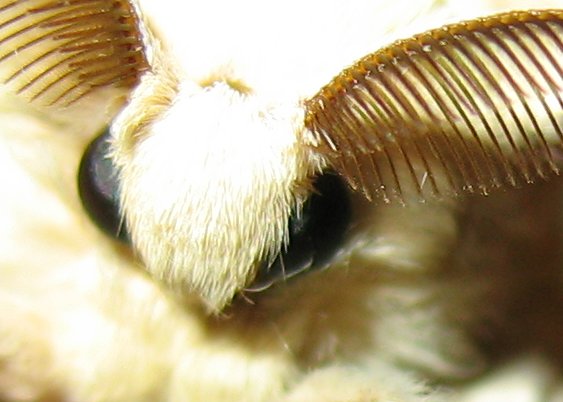
Here's a photo of the antennae in mega-close-up. Also, notice that there is no proboscis - the adult moths have no mouths, and cannot eat.
Once he finally finds the female, the male grasps her by the abdomen, and they settle down. The males flap their wings in short bursts for a while, and then stop altogether. They will remain paired like this for twelve to twenty-four hours. They can be safely separated after three hours, because the male will have inseminated the female. If you choose to separate them, grasp each moth gently by the wings, and twist them apart like removing a key from a lock. If you aren't careful, you can damage the female's ovipositor, causing her trouble laying eggs. A single male can be reused for an additional 1 to 2 matings.
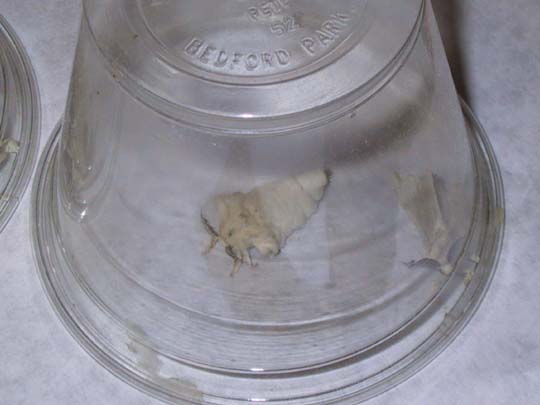
In order to control the pairings, I place pairs of moths under plastic cups. This also helps keep the pattern of egg laying neat and clean.
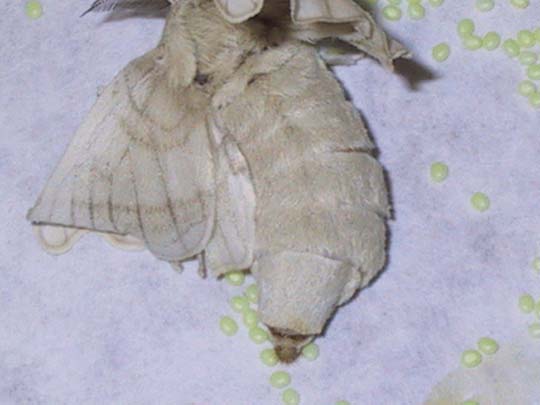
After mating for 12 to 24 hours, the pair will separate, and the female will begin to lay her eggs. Most females will lay between 150 and 300 eggs over the course of two to three days. Some moths can lay as many as a thousand. The eggs start out lemon yellow, and over a day or two will fade through tan to dark gray or black. If they do not change colors, the eggs are likely infertile. After they change to dark gray, they can be placed into cold storage. The most convenient way is to trim the paper into colony-sized circles, and place them inside a jar or freezer bag, and put them in the door or a crisper drawer. The main body of the refrigerator can get too cold for them; ideal temperature is between 35'F and 40'F. If the eggs are not refrigerated, sometimes they will hatch, and other times they will just dry up and die. May 7, 2004.
That's the whole life cycle of Bombyx mori. It starts over again with the eggs in the spring!