Copper Tablet Weaving Loom
I was intrigued with Sara Lamb’s cute little copper band loom, and so I looked up Archie Brennan’s design page and looked at it, and consulted with Sara (thanks, Sara!) about its salient qualities and how I might adapt it for tablet weaving. Archie’s original version is designed for tapestry; Sara uses them for cut pile, and has also made adaptations for narrow-band weaving.
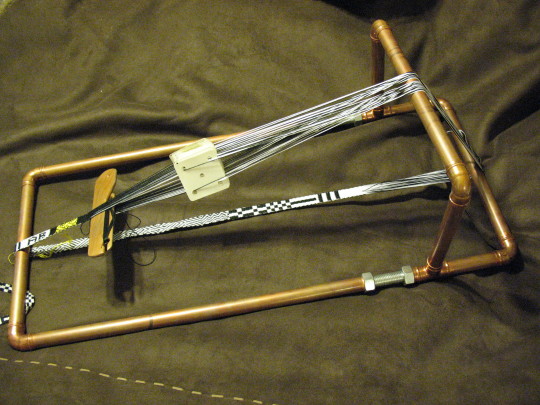
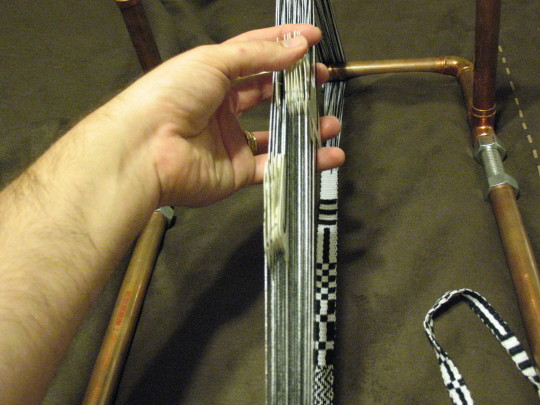
This is the loom all assembled, with a band in progress.
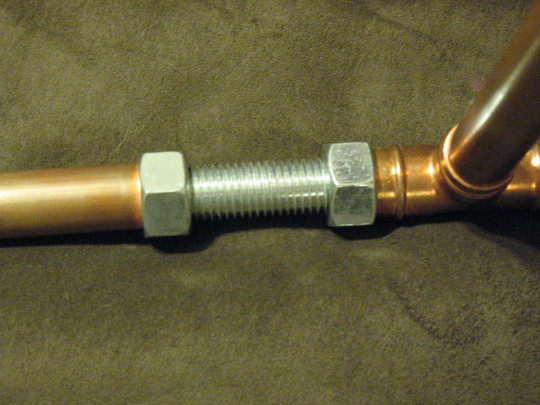
Tension is provided by two pieces of 3/4″ all-thread, with two 3/4″ bolts on each. Move the bolts apart, the tension is tighter. Move them closer together, the tension is looser. The tension control is exquisite; I can tweak it just a half-turn, and get it perfect.

The bridge raises up the warp, so that you don’t bump into the bottom layer while you’re working on the top.
The configuration allows for plenty of working room, even with two packs of cards. This is often a challenge with other loom configurations.

And this is the coolest thing: it breaks down into a bunch of straight pieces that fit into a small bag.
The copper pieces are 3/4″ tubing. I found the guy in the Home Depot plumbing department, and said, “I’d like a ten-foot length, in the following convenient pieces:” and left him with a list and went off to find the all-thread. I ended up buying a tubing cutter anyway, so that I could make adjustments once I got home. I’m glad I did, and I’ll get use out of it later on – but I’m pretty sure that next time, I’ll still have the guy at the store dice up the pipe for me. At the very least, I’ll have him cut off the long lengths, otherwise it won’t fit in the car.
The lengths: the long pieces are 20″ long. The short pieces away from the weaver, are 4″. The bridge is 8″ high. The loom is 12″ wide. So:
2 pieces 20″ long
2 pieces 4″ long
2 pieces 8″ long
3 pieces 12″ long (NOTE: I shortened these later to about 8″, which just fit my work better)
6 elbows (make sure the pipe fits into both sides – some of the elbows go from one pipe size to another)
2 T’s (same thing – make sure they accept the 3/4″ pipe on all 3 openings)
two pieces of 3/4″ all-thread
two 3/4″ bolts
Archie’s plan uses two six-inch pieces of all-thread rod. On Sara’s suggestion, I got two-foot pieces, because they help keep the loom from bowing, and add some heft to the loom. However, they more than double the weight – the copper is just over three pounds, but the all-thread and the bolts are more than five pounds. The whole thing, about eight and a half pounds. I plan to put screws in some of the joints where the elbows join the long parts, to stabilize it – right now, the whole thing is a little TOO flexible, and can get pushed crooked if I rest it on something not-flat when I’m weaving (like, kicking my feet up on a foot stool, and putting the loom on my legs).
All told, it was in the neighborhood of forty dollars for all the pieces. The pipe was twenty-something, the all-thread is like six bucks a piece, and the elbows and T’s are under a dollar. I bought a little bag of elbows, so I have more than I needed for this project, but it made them a LOT cheaper.
It makes a warp about 5’8″ long, which is great for bookmarks or sampling, and perfect for portability and workshops. I could use a longer warp and chain it up, but the short warp is VERY convenient and quick to put up.
How cool! It’s definitely a step up, techologically, from my a-large-nail-sticking-up-from-either-end-of-a-long-chunk-of-wood loom! I might have to make one of these. 🙂
How cool! It’s definitely a step up, techologically, from my a-large-nail-sticking-up-from-either-end-of-a-long-chunk-of-wood loom! I might have to make one of these. 🙂
Very neat. That might also be a good way to make a silk fabric stretching frame for silk painting, with a few mods!
Very neat. That might also be a good way to make a silk fabric stretching frame for silk painting, with a few mods!
I am still impressed by the plastic loom kids make potholders with, so this is MAJORLY impressive! Looks like you need to know welding as well. Ha!
I am still impressed by the plastic loom kids make potholders with, so this is MAJORLY impressive! Looks like you need to know welding as well. Ha!
You do tablet weaving!? I thought I was the only person left on the planet who did tablet weaving!
You do tablet weaving!? I thought I was the only person left on the planet who did tablet weaving!
There’s a LJ community, and a Yahoo list, and a list at crafter.org, and a print journal…. lots of tablet weavers! I’m teaching a workshop this weekend; it filled with 15 people, which surprised me – I didn’t know the level of interest was that high.
There’s a LJ community, and a Yahoo list, and a list at crafter.org, and a print journal…. lots of tablet weavers! I’m teaching a workshop this weekend; it filled with 15 people, which surprised me – I didn’t know the level of interest was that high.
I’ve thought about soldering (sweating) the joints that I want to fix – but I like the reversibility of screws.
I’ve thought about soldering (sweating) the joints that I want to fix – but I like the reversibility of screws.
I do tablet weaving! I learned in a class of about 7 people, and 4 or 5 of my friends want to learn.
I’m so making this loom. It seems much more portable than my c-clamps and 2×4. Is the 5’8″ weaving length a typo?
I do tablet weaving! I learned in a class of about 7 people, and 4 or 5 of my friends want to learn.
I’m so making this loom. It seems much more portable than my c-clamps and 2×4. Is the 5’8″ weaving length a typo?
Not a typo… my warp course is five feet, eight inches long, all the way around. Some of that length is unweavable, due to the knots.
I use a lot longer warps when I warp up my big Inkle loom – I can get up to 5 yards on that one, if I use all the bars – but this is great for samples and portability.
I haven’t actually used the C-clamps method – what bothers me, is thinking about the ergonomics. Doesn’t the band want to lie sideways (up and down) instead of flat? How do you orient yourself to it to weave?
It does want to turn a bit, but I’ve never used any other method, so I don’t know any better.
It does want to turn a bit, but I’ve never used any other method, so I don’t know any better.
So do you weave up and down, or do you push it flat-ways and weave parallel to the table?
So do you weave up and down, or do you push it flat-ways and weave parallel to the table?
Neither, really. My loom is a 5′ long piece of old 2×4, so when I weave I have one end going over my leg, and the other on the floor a couple feet out in front of me.
Keeping in mind that the threads are all bunched together at the c-clamps, it swivels like a hammock. So, it’s more parallel to the 2×4 than perpendicular while I’m weaving, but it’s not perfect. It tends to be more perpendicular when I’m not working on it, but when I am, it swivels to whatever angle my hand is coming at it from.
Reading back over this, I think I just realized what you meant –
The cool thing is, it’s not soldered together – it just sticks together by friction, like tinker toys!
Reading back over this, I think I just realized what you meant –
The cool thing is, it’s not soldered together – it just sticks together by friction, like tinker toys!
Gotcha. I think I would find that very frustrating – partly because I’m often doing multiple-pack techniques, and it seems like it would be trying to flip back and forth as I’m selecting packs.
Gotcha. I think I would find that very frustrating – partly because I’m often doing multiple-pack techniques, and it seems like it would be trying to flip back and forth as I’m selecting packs.
Many, many thanks: I’m going to have to show this to the Czarina. She’s been wanting to do metalweaving but hasn’t been able to justify paying for the loom, and this way she also gets to play with the torch a bit more. thanks again.
Many, many thanks: I’m going to have to show this to the Czarina. She’s been wanting to do metalweaving but hasn’t been able to justify paying for the loom, and this way she also gets to play with the torch a bit more. thanks again.
Wow. I have no idea how that works, but dayum it’s cool looking! You constantly amaze me with all the groovy stuff you can do. 🙂
Wow. I have no idea how that works, but dayum it’s cool looking! You constantly amaze me with all the groovy stuff you can do. 🙂
copper pipe looms…
Interesting the versatility of Archie’s design. I had my dh and ds build one for me last month with a removable spring at the top to space the warp. I had been thinking about using it for card weaving, but hadn’t thought of using the heddle bar the way you have.
You can see mine at: http://fiberewetopia.blogspot.com/2007/05/tapestry-loom-etc.html
Great idea! And it just looks amazing. I find the simplest way is to (more or less) nail one end of the warp to the wall and put weights to the other end. Basically the same principle as a standing up weighted loom.
I love all the pictures on you journal. I saw one of your silk tablet weaving at spinning_fibers. **Love silk**
I built my wife a huge floor-standing inkle loom (12 yards of warp!) that she uses for card weaving as well as a warping board for our 4-harness loom. I then built one of Sarah Lamb’s pipe tapestry looms (soldered the joints for strength). But she’s been bugging me for a while about making a portable tablet loom. This will do the trick. Thanks!
If you solder about half the joints, you’ll get more stability but still be able to break it down. I’m glad the page was helpful!
That is too cool! I just taught a card weaving class to my guild last month, so we’re all hepped up on card weaving right now. This is awesome. So much better than 2 clamps and a 2×4.
Thanks!
Yeah, the clamps method is a total last resort, for me… I think it really handicaps you, and you end up fighting with the setup, instead of learning the medium.
Securing some of the pipe joints – an alternative to hot soldering or screw fastening
Alternatively one could use a copper pipe specific adhesive that is rated for use in home water piping systems. Check the glue section at your hardware store for copper pipe glue.
In the case where you want to be able to disassemble the joints at some time in the future and still don’t want to solder or screw the joints together, you can use a hot melt adhesive that archers use to glue the steel arrow points to wood or aluminum arrow shafts. I’ve used it for years to glue metals together as well as wood to metals, where later removability was desired. It’s usually available at archery shops and one brand is called “FERR-L-TITE” and is made by “Bohning Company Ltd. 7361 N. Seven Mile Rd. Lake City MI. 49651 USA “, and costs around $5 for a 3 inch long bar of clear amber colored adhesive. It can be melted over a candle flame or low gas stove flame, for application. Be careful, it sticks to you and is hot enough to burn your skin, so wear protective gloves and eye protection. It melts and handles similar to sealing wax, but isn’t as brittle.
Also be careful when heating copper of any shape and size, since it conducts heat very quickly from where the heat is being applied to where you may be holding it, some distance away, and can burn you when you aren’t expecting it to.
To loosen a “FERR-L_TITE” joint, simply reheat the joint it was used on and it melts and the joint can be pulled apart. Then later it can be reheated and be put together again.
I’ve never known it to loosen while sitting in an overheated car in the hot sun, but that may be something for people in really hot areas to be careful about. Other than that it seems to be a reasonably strong adhesive for light load applications, that aren’t critical.
What do you use to prevent oxidization from transferring onto your weaving?
I haven’t noticed any problems so far. The weaving only passes over the copper once, and the copper is kept clean and dry… if I were using it in damp environs, or if it was getting wet repeatedly, I would probably coat the copper with some sort of paint or enamel. But as it is, I just weave with it bare.
That’s awesome! Must try.
Hi – I have just made your version of the copper pipe loom and it looks great! Am in the process of figuring out how to warp it in a continuous style. I am sure I saw a video of you demonstrating this for a class, but I cannot locate it again. I will figure it out. Thank you for the great instructions.
My husband just made one of these for me and I’ve been a weaving fool for three days straight! Thank you so much for posting these instructions! I have had cards for three years now, just waiting for a loom and to be able to have read enough to understand how the heck this tablet weaving thing works. I get it, finally! Again, thank you!
I have just made this loom using 1/2″ PVC pipe and 3/8″ all-thread rod. I cemented the elbows on the pieces front to rear along with the TEE’s also the bridge. I left the cross pieces free and did not cement the bridge to the TEEs. The loom appears to be very rigid and does not wobble. It is easily broken down. The 3/8″ nuts fit snuggly into the 1/2″ TEE’s.
Michael….great fun in our two classes. At Lowes gathering copper, etc. to make my loom. Did you say you glued the joins? If so….what kind of glue? I would like to keep it portable to breakdown for stuffing in a small space for travel. Thanks so much…Charlotte
I use a five-minute epoxy, the kind where you squirt out a bead that has resin and hardener, and stir them together. Any kind of good-quality glue would work – the main thing to do as far as break-down-ability, is to glue only one pairing of each joint. Decide if you want your elbows attached to the long pieces, or to the short pieces (which is what I chose) – that way, it stabilizes each joint, but doesn’t get in the way of breaking it down to parts.
You can see on the blog post, where the glued parts are together… there’s one with the elbows on it, on the top of the stack.