Copper Tablet Weaving Loom
I was intrigued with Sara Lamb’s cute little copper band loom, and so I looked up Archie Brennan’s design page and looked at it, and consulted with Sara (thanks, Sara!) about its salient qualities and how I might adapt it for tablet weaving. Archie’s original version is designed for tapestry; Sara uses them for cut pile, and has also made adaptations for narrow-band weaving.
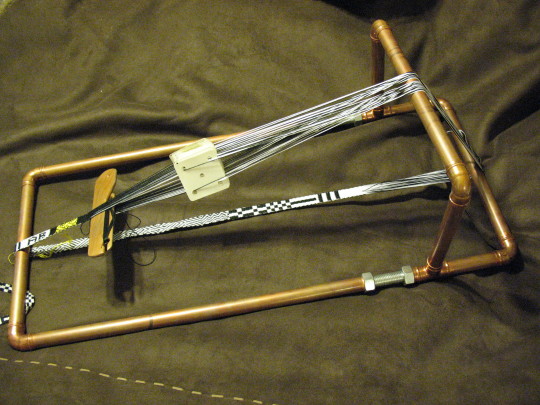
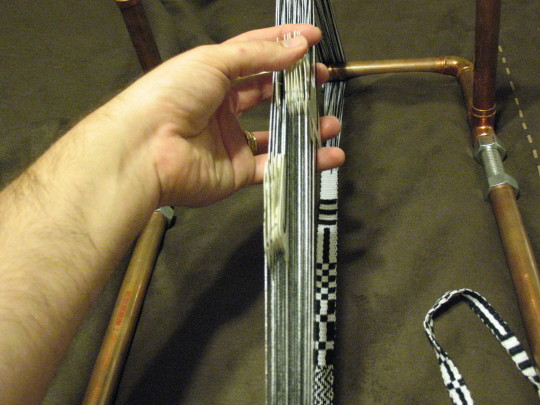
This is the loom all assembled, with a band in progress.
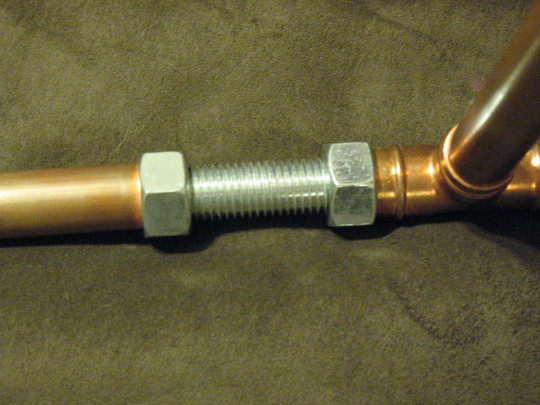
Tension is provided by two pieces of 3/4″ all-thread, with two 3/4″ bolts on each. Move the bolts apart, the tension is tighter. Move them closer together, the tension is looser. The tension control is exquisite; I can tweak it just a half-turn, and get it perfect.

The bridge raises up the warp, so that you don’t bump into the bottom layer while you’re working on the top.
The configuration allows for plenty of working room, even with two packs of cards. This is often a challenge with other loom configurations.

And this is the coolest thing: it breaks down into a bunch of straight pieces that fit into a small bag.
The copper pieces are 3/4″ tubing. I found the guy in the Home Depot plumbing department, and said, “I’d like a ten-foot length, in the following convenient pieces:” and left him with a list and went off to find the all-thread. I ended up buying a tubing cutter anyway, so that I could make adjustments once I got home. I’m glad I did, and I’ll get use out of it later on – but I’m pretty sure that next time, I’ll still have the guy at the store dice up the pipe for me. At the very least, I’ll have him cut off the long lengths, otherwise it won’t fit in the car.
The lengths: the long pieces are 20″ long. The short pieces away from the weaver, are 4″. The bridge is 8″ high. The loom is 12″ wide. So:
2 pieces 20″ long
2 pieces 4″ long
2 pieces 8″ long
3 pieces 12″ long (NOTE: I shortened these later to about 8″, which just fit my work better)
6 elbows (make sure the pipe fits into both sides – some of the elbows go from one pipe size to another)
2 T’s (same thing – make sure they accept the 3/4″ pipe on all 3 openings)
two pieces of 3/4″ all-thread
two 3/4″ bolts
Archie’s plan uses two six-inch pieces of all-thread rod. On Sara’s suggestion, I got two-foot pieces, because they help keep the loom from bowing, and add some heft to the loom. However, they more than double the weight – the copper is just over three pounds, but the all-thread and the bolts are more than five pounds. The whole thing, about eight and a half pounds. I plan to put screws in some of the joints where the elbows join the long parts, to stabilize it – right now, the whole thing is a little TOO flexible, and can get pushed crooked if I rest it on something not-flat when I’m weaving (like, kicking my feet up on a foot stool, and putting the loom on my legs).
All told, it was in the neighborhood of forty dollars for all the pieces. The pipe was twenty-something, the all-thread is like six bucks a piece, and the elbows and T’s are under a dollar. I bought a little bag of elbows, so I have more than I needed for this project, but it made them a LOT cheaper.
It makes a warp about 5’8″ long, which is great for bookmarks or sampling, and perfect for portability and workshops. I could use a longer warp and chain it up, but the short warp is VERY convenient and quick to put up.
I’m hoping this message will get to you…. I’m hoping to get the supplies to make this awesome loom. I’m currently using my schacht tapestry loom for my first tablet weaving creation. I can see where this loom would work way better but I do not know how to warp it. One post mentioned they saw a video on how to warp this loom but I’ve been looking and cannot find it…. I’m hoping you can help me figure out where the video is or tell me how it’s done…
Thank you so much!!
https://www.youtube.com/watch?v=PpWvgMUWjPk
https://www.youtube.com/watch?v=uU1OVcUCoWY
https://www.youtube.com/watch?v=FWjQCsI2BCE shows the process in more detail – the loom is different, but the idea is the same.
Feel free to email at oakenking *@* gmail *dot* com if you have more questions!
I got my loom made! I bought all the parts at our local big box store & the clerk there was willing to cut all the pierces for me. I put it all together and hated it!!!! I just felt that it wasn’t stable enough for me. Hubby was kind enough to solder all the joints and WOW what a difference it made!!! It is now so stable and I’ve done a few pieces on it already.
I did not do the continuous warping as I wanted to do several colors, but after I got it warped up it was so easy to use. I also like to move my twist every few turns so I put each corner of the loom on blocks ( May add some kind of legs later) which allows me to push down the twist to save more weaving area.
Thank you so much for your directions and posting the YouTube videos!!!
I got my loom made! I bought all the parts at our local big box store & the clerk there was willing to cut all the pierces for me. I put it all together and hated it!!!! I just felt that it wasn\’t stable enough for me. Hubby was kind enough to solder all the joints and WOW what a difference it made!!! It is now so stable and I\’ve done a few pieces on it already.
I did not do the continuous warping as I wanted to do several colors, but after I got it warped up it was so easy to use. I also like to move my twist every few turns so I put each corner of the loom on blocks ( May add some kind of legs later) which allows me to push down the twist to save more weaving area.
Thank you so much for your directions and posting the YouTube videos!!!
This looks fabulous. Thank you. If you are not doing a continuous warp, but have some cards with 3 colors vs. 1 color etc and it changes across the warp….do you warp it on its side as in your video?
Yes, I still warp the tablets on the loom, just one thread at a time. I find this MUCH preferable to measuring all the threads at once, and then threading. I just lay the tablet down, put one end of the thread through, wind around the loom, and tie that thread end to beginning, and clip. I don’t do many pieces that are threaded that way, though – it still takes me an hour or two to put up a warp like that, where I can do the speed warp in just minutes.
Michael, thanks for getting back to me. I’m off to the store today to get parts and put this together. I find with my inkle loom that the angle is not steep enough for my comfort and the distance not great enough to weave anything substantial before I have to wind forward and or deal with too much twist.
Love tools and playing with making things work!
Bettes
Michael, thanks for getting back to me. I\’m off to the store today to get parts and put this together. I find with my inkle loom that the angle is not steep enough for my comfort and the distance not great enough to weave anything substantial before I have to wind forward and or deal with too much twist.
Love tools and playing with making things work!
Bettes
If you use fishing swivels (1/thread), you can deal with the warp getting twisted.
You actually need to use 1/tablet; the threads don’t twist independently, they twist as a group of 4. However – I have always found that the speed of warping in a group with all the tablets in a stack is so much quicker, it’s not worth the tedious labor of tying the individual threads. So I just choose balanced designs most of the time, and work around it in the rare cases where I can’t.
Thank you for posting this along with all the measurements. I even have a pipe cutter.